Monday, May 21, 2012

Learn Illustrator within 20 Days---Day 5


Day 5: Drawing with Pen Tool

The Path Tool will be the hardest tool to learn in Illustrator. It usually take weeks to learn and beginners always end up in frustration while figuring how it works. So don’t give up and practice it every day and soon you will be able to draw any shape.

Drawing Straight Lines

Select the Pen Tool and click once to add the first anchor point. Move your mouse to the next position and click again to create the second point. The two anchor points will be connected together. Continue doing this to create a W shape as shown.To draw a new line, click the Selection Tool(The Black Arrow Icon) and click back the Pen Tool again.

Closing a Path

To close a path, click back the starting point to close the shape.

Drawing a Curved Line

Click and drag to put out the handles to create a smooth anchor point.

Changing Path Directions

Click and drag to create a smooth anchor point. Without releasing your mouse, hold Alt/Option and drag the handle up to change the path direction.

Drawing a Circular Path

Click and drag to create a smooth anchor point. Continue adding points and click back the starting point to close the path.

Adding Anchor Points

With the Pen Tool selected, go near the path where you want to add a new anchor point. A plus sign will appear next to the pen, click on the path to create a new anchor point.

Removing Anchor Points

To remove point, move your Pen Tool close to an anchor. A minus sign will appear next to the pen. Click on the anchor point to delete it.

Converting Anchor Points

To convert a smooth anchor point to a sharp anchor point, move your Pen Tool near the anchor and hold Alt/Option and your Pen Tool will change to an arrow shape. Click on the smooth anchor to convert it to an anchor point. Click and drag on the anchor point again to change it back to a smooth anchor point.

Moving Anchor Points

Select the Direct Selection Tool and click and on anchor you want to move. Click and drag to change positions.

Changing Anchor Directions

With the Pen Tool, you can quickly change the anchor directions. Hold Ctrl/Command to quickly change the Pen Tool to Direction Selection Tool. Select the anchor point you want to edit. The anchor handle will appear. Now release Ctrl/Command and hold Alt/Option to change it to Convert Anchor Tool. Click and drag the handles to change the direction.

Drawing an Old Key

After learning the concepts of how the Pen Tool works, we will apply what you have learnt to create this ancient old key shape. For the right angles, hold Shift before adding anchor point to constrain it to 90-degree.


Final Illustration

This is the final illustration.

Tips for Using Pen Tool
  • Use as little anchor points your need to create your shape
  • Add anchor points where there is a change in direction of the line/curve
  • Use shortcuts like Alt/Option or Ctrl/Command to quickly swap to other tools to edit your path
  • Hold shift to lock your path while adding new anchor point for 45-degree increments.

More Training for Pen Tool

I have included more exercises for tracing using Pen Tool. Save it to your desktop and place it in illustrator by going to File>Place. Select the image and make sure Template is ticked. The image will now be faded and placed as a template. Now you can start practicing and don’t give up.


For a more comprehensive guide on using Pen, Next Lesson: Using Brushes


Learn Illustrator within 20 Days---Day 4


Day 4: Drawing with Pencil Tool


We can quickly draw shapes and lines quickly using the Pencil Tool. This lesson will show you some of the tricks in drawing smooth and fluid lines.

Drawing a Line

Select the pencil tool and click and drag to draw a free hand line drawing.


Closing Paths with Pencil Tool

To close a path, hold Alt/Option as your Pencil Tool reaches the start point. A circle icon will appear next to the Pencil Tool to indicate path closure.

Smoothing Jaggy Lines

Normally when you draw with the Pencil Tool, the path looks jaggy. To smothen the parts that are jaggy, simply hold Alt/Option to turn the Pencil Tool to Smooth Tool. Then draw over the the area of the lines which you would like to smothen.

Reshaping Path

To reshape a path, make sure your path is selected and use the Pencil Tool to redraw the parts you would like to reshape. Note that the start and end path must be close to the original path to make it work.


Pencil Tool Preferences

You can turn on the Pencil Tool Preferences by double clicking on the Pencil Tool. You can change the fidelity and smoothness to find a combination that works for you.
Fidelity: Determines how close the path is drawn to your mouse movement. Set it at a higher fidelity if your not good at drawing with your mouse.
Smoothness: The higher you set for smoothness, the less anchor point it produces. Thus, producing a smoother line.

Next Lesson: Drawing With Pen Tool »

Learn Illustrator within 20 Days---Day 3


Day 3: Drawing Basic Shapes


In this lesson, we will look at how to use the shape tools to draw our basic shapes in illustrator. But before we start, we will look at how to select a basic shape so that you have no problems in selecting and editing shapes in Illustrator.

Selection Tools

There are 2 types of selection tool in Illustrator used for selection objects.
Selection Tool: Used for selecting and moving a shape. It can also be used to resize a shape.
Direct Selection Tool: Selects a single anchor point instead of the whole shape. Used for editing anchor point of a shape. Click once on a point to select and hold Shift to select multiple anchor points.

Shape Tools

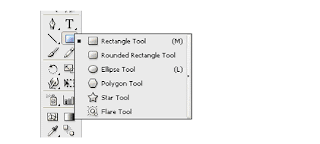
Now we will move on to the Shape Tools. When you go to the Tool Palette and hold the Rectangle Tool, a list of shape tools will expand out for you to pick. We will start with the default Rectangle Tool.

Understanding Fill & Stroke

Click and drag out a Rectangle as shown. By default, it has a white fill and black stroke. (Stroke is the border of the shape)

Changing Fill Color

Let’s start changing the fill color for the rectangle. Double click the Fill from the Tool Palette. It will pop up the Color Picker. Drag the slider to blue and select a deep blue color. Click Ok after that.

Removing Stroke

Click the Stroke in the Tool Palette once to swap it above Fill. Click the None icon boxed up in red to set the Stroke to None. The black stroke will disappear.


Constrain Proportions

To draw a perfect square, we will select the Rectangle Tool. Hold Shift and drag to draw a square. Same for the circle, we will select the Ellipse Tool and hold Shift to drag out a circle.

Resizing Shapes
To resize shapes, select the shape using the Selection Tool and a bounding box will appear. Drag the corner anchor point to resize it. To constrain to proportion while resizing, hold Shift as you resize. Also hold Alt/Option if your want to resize from the same position.


Rotating Shapes

Select the shape with the Selection Tool and a bounding box will appear. Move your cursor near the anchor corner and a rotation icon will icon, click and turn it to rotate the square. To snap at 45 degrees increment, hold Shift and turn.


More Options for Shape Tools

Select the Star Tool. Click once on the artboard and an option will pop up. Enter the same values below and click Ok. It will draw a star burst shape. This method can be used to bring out more options for shape tools.


Conclusion

Almost all the objects found in our daily life can be built from combining using the basic shape tools. In Day 9, we will learn about Compound Paths which will help us create more complicated shapes by adding and subtracting from the basic shapes.
Next Lesson: Drawing with Pencil Tool »