Friday, May 25, 2012

Learn Illustrator within 20 Days---Day 7


Day 7: Creating Compound Paths

Almost all objects in over daily life can be built with basic shapes. By drawing shapes using our basic shape tool, we can use compound path to combine or subtract shapes to create what we need.

What is Compound Path?

Compound path is made out of at least two objects. You can add, subtract and intersect shapes to form a compound path.


Compound Path Cheat Sheet

I have compiled a cheat sheet to show how it looks like using different functions of compound path. You can see the final effect after we applied the compound path to three colored circles.

Creating an Ancient Key Using Compound Path

In this tutorial, I will show you how to create an ancient key using compound paths rather than using Pen Tool in our previous tutorial.

Turning on the Grids

Go to View>Show Grid to turn on the grids, then go and turn on Snap to Grid. With the grid and snapping turned on, you can easily snap objects to the grid.

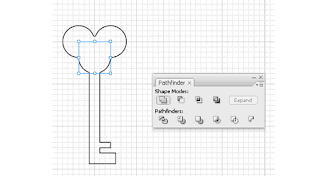
First draw a Circle using your Shape Tools, hold Alt/Option as you click and drag a new copy beside it.

Duplicate a new circle and place it on top.

Next, select the Rectangle Tool and continue building up your key shape.


Swap the Fill and Stroke for the object, this will show you all the objects we have.

Using the Selection Tool, select the whole shape and go to Window>Pathfinder to bring up the Pathfinder. Select Add to shape to combine the objects.

You can still make changes to the compound path at this stage. Try moving the top circle below to see how it works. To do this, double click with the Selection Tool to go into isolation mode to move the individual shapes.

Next we will swap it back to black fill again, draw a circle in the middle which we will punch a new hole there. Select both shapes and select Subtract from shape area.

Here is the final illustration.

Next Lesson: Working with Color and Strokes »

Learn Illustrator within 20 Days--Day 6


Day 6: Using Brushes

Using the Brush Tool, you can add styles to your lines. It can also be used to mimic calligraphy, crayon and brush strokes. This will help you add more life to your line works.

Applying Brush Stroke

Select the Brush Tool and draw your object. Then go to your Brushes Palette and select the crayon brush to apply the effect.

Calligraphy Brush Stroke

To apply a calligraphy brush stroke, draw your path and select the calligraphy brush. Increase the Stroke to make it thicker.

Calligraphy Brush Options

To make changes to your calligraphy brush, you can double click the Calligraphy Brush to pop up the calligraphic brush options. Drag the brush to change the angle in the thumbnail. Change the Diameter makes it thicker.

Create a Border Pattern

Draw a rectangle and pick the border pattern. This will create a frame for it.

Creating a New Pattern Brush

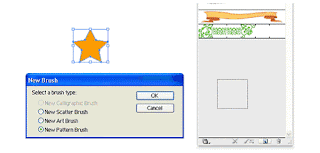
To crate a new brush. Draw a Star and drag it to the Brushes Palette. A New Brush selection appears. Choose New Pattern Brush for it.

Applying Pattern Brush

Draw a circle and apply our new brush stroke.

Next draw a line path and apply the brush stroke. Double click the star brush from your brushes and set Scale and Spacing to 20% to get the effect below.

Brushes are very good for aligning objects and creating borders. So experiment with it and have fun!
Next Lesson: Creating Compound Paths »

Check Out this Song....Sacrifice